
Empower your support team with a bot that answers questions about technical documentation using Windmill, OpenAI, and Supabase.

Midjourney prompt: a blog cover about a discord bot that answers questions about technical documentations, surrended by books --aspect 3:2
Replace a SaaS
"Replace a SaaS" is a cheeky title for a blog series. We believe you don't always need a dedicated SaaS to solve a problem. You can often build your own minimal but tailored-to-your-needs solution on your own, and stop accumulating subscriptions.
Today, we will create a bot that answers questions about technical documentation leveraging Windmill, OpenAI, and Supabase, with an approval step.
Demo
To directly setup your own bot on Windmill (Self-hosted or cloud) or rather watch a video tutorial of the actual set-up, you can skip the following sections and go directly to the How to setup it yourself section.
Supabase
We will use Supabase to store the embeddings, by taking inspiration from the Storing OpenAI embeddings in Postgres with pgvector tutorial.
The pgvector extension in PostgreSQL enables the storage and querying of vector embeddings. Embeddings are representations of text or other information that capture relatedness or meaning. With pgvector, you can store embeddings in a PostgreSQL database and perform similarity searches using vector math operations. This opens up possibilities for powerful applications like semantic search and recommendation systems on large amounts of data.
You'll need to follow the logic of the tutorial up to the point where you have created a table with the pgvector extension enabled, and you have created the match_documents function.
The only difference is that we will store the link of the documentation page for each embedding to also provide the sources, meaning we'll add a link column. Here the 3 commands to run:
- does not change:
create extension vector;
CREATE TABLE documents (
  id bigserial PRIMARY KEY,
  content text,
  link text,
  embedding vector(1536)
);
create or replace function match_documents (
  query_embedding vector(1536),
  match_threshold float,
  match_count int
)
returns table (
  id bigint,
  content text,
  link text,
  similarity float
)
language sql stable
as $$
  select
    documents.id,
    documents.content,
    link varchar,
    1 - (documents.embedding <=> query_embedding) as similarity
  from documents
  where 1 - (documents.embedding <=> query_embedding) > match_threshold
  order by similarity desc
  limit match_count;
$$;
Create a scheduled flow that ingests your data and creates embeddings
We need to ingest a data source, here the Windmill documentation. We can accomplish this by creating a scheduled flow that periodically retrieves the documentation from the Windmill repository on GitHub, creates embeddings using OpenAI, and stores the embeddings in Supabase using pgvector.
Flow overview
Workflows are graphs (DAG) that represent the dependencies between steps.
The goal of an orchestrator or workflow engine is to execute the steps on different workers that respect that graph's dependencies, and pass the required data defined in the steps' inputs while applying parallelism when possible.
In Windmill, each step is code with a main function in TypeScript, Python, Go, Bash or raw queries to databases.

This flow is available on Windmill Hub.
The flow is composed in the following way (each step's logic and code will be detailed further):
- Scrape the Windmill documentation from GitHub using the Oktokit API.
Then we use a for-loop to iterate over the results and run the following step for each result:
- Create the embeddings using OpenAI
- Store the embeddings in Supabase using pgvector
Each iteration of the for-loop are indiviual jobs and can be run in parallel, retried and error handled independently.
From Windmill, pick + Flow, and either import YAML or JSON from the Hub or start building manually.
Scraping the Windmill documentation
We could have written the script that fetches from Github, but since it's generic task, there is already a community-contributed script that does exactly that on the Windmill Hub.
Direclty from Windmill, we picked the script that fetches the content of a repository from Github and forked it.
We modified it to only extract content from markdown files. As we are using Docusaurus, we also need to transform the path of the file to get the correct URL.
Code: Extract content from Github (TypeScript)
import { Octokit } from 'https://cdn.skypack.dev/@octokit/rest';

type FileContent = { content: string; link: string };

type Github = {
	token: string;
};

export async function main(
	gh_auth: Github,
	owner: string,
	repo: string,
	path?: string,
	ref?: string,
	result_format: 'github_object' | 'json' = 'github_object'
): Promise<FileContent[]> {
	const octokit = new Octokit({ auth: gh_auth.token });

	const response = await octokit.request(
		`GET /repos/{owner}/{repo}/contents/${path}${ref ? '?ref=' + ref : ''}`,
		{
			owner,
			repo,
			headers: {
				'X-GitHub-Api-Version': '2022-11-28',
				Accept: `application/${result_format === 'json' ? 'vnd.github+json' : 'vnd.github.object'}`
			}
		}
	);

	const entries = response.data.entries;

	const fileContents: FileContent[] = [];

	for (const entry of entries) {
		if (entry.type === 'file') {
			const isMarkdown = entry.name.endsWith('.md');
			const isMDX = entry.name.endsWith('.mdx');

			if (isMarkdown || isMDX) {
				const link = getDocusaurusPathFromGithub(entry.path);

				const contentResponse = await octokit.request('GET /repos/{owner}/{repo}/contents/{path}', {
					owner,
					repo,
					path: entry.path,
					headers: {
						'X-GitHub-Api-Version': '2022-11-28',
						Accept: 'application/vnd.github.v3.raw' // Request raw content of the file
					}
				});

				const content = contentResponse.data as string;

				fileContents.push({
					content,
					link
				});
			}
		} else if (entry.type === 'dir') {
			// Recursively process directories
			const dirContents = await main(gh_auth, owner, repo, entry.path, ref, result_format);
			fileContents.push(...dirContents);
		}
	}

	return fileContents;
}

function getDocusaurusPathFromGithub(githubUrl: string): string {
	const match = githubUrl.match(/docs\/(.+\.(md|mdx))/);
	if (match) {
		let filePath = match[1];
		filePath = filePath.replace(/\.(md|mdx)$/, '');

		// Split the path into segments
		let pathSegments = filePath.split('/');

		// Remove numbers and underscores from the beginning of each segment
		pathSegments = pathSegments.map((segment) => segment.replace(/^[0-9]*_/, ''));

		// Reconstruct the path
		filePath = pathSegments.join('/');

		return '/docs/' + filePath;
	}
	return githubUrl;
}
Notice that the script takes a special parameter gh_auth which is a Windmill resource that contains the GitHub token.
Create the embeddings
Using the OpenAI API, we can create embeddings for each of the documents. Simirarly to the Github script, there is an other script on the Windmill Hub for it: Create embedding.
This script requires setting up an OpenAI integration.
Store the embeddings on Supabase
Finally, we can store the embeddings in Supabase using the pgvector extension.

All embeddings are stored in a single Supabase table.
Supabase is easily integrated to Windmill.
Code: Store the embeddings on Supabase
import { refreshAndRetryIfExpired } from 'https://deno.land/x/[email protected]/mod.ts';

type Supabase = {
	url: string;
	key: string;
};

export async function main(
	auth: Supabase,
	embedding: any,
	document: string,
	link: string,
	token?: {
		access: string;
		refresh: string;
		expires_at?: number;
	}
) {
	return await refreshAndRetryIfExpired(auth, token, async (client) => {
		const query: any = await client.from('documents').insert({
			content: document,
			embedding,
			link
		});

		return query;
	});
}
This is what our Flow looks like now.
Schedule the flow
We can schedule the flow to run every month.
- Go the Settings
- Click on the
Scheduletab - Edit the Cron expression to run every month:
0 0 1 * * - Enable the schedule
Learn more about Windmill features
Slack or Discord
Windmill uses Discord for its community, but you can also build the same bot for Slack. For Slack, see:
Create an application on Discord Developer Portal
To get started, go to the Discord Developer Portal and create a new application. Give your application a name and add a bot to it (there is not need to set specific Bot Permissions for this use case). This will provide you with the necessary credentials to interact with the Discord API.
From the Bot menu, you can Reset token and get a token to use in the approval step.
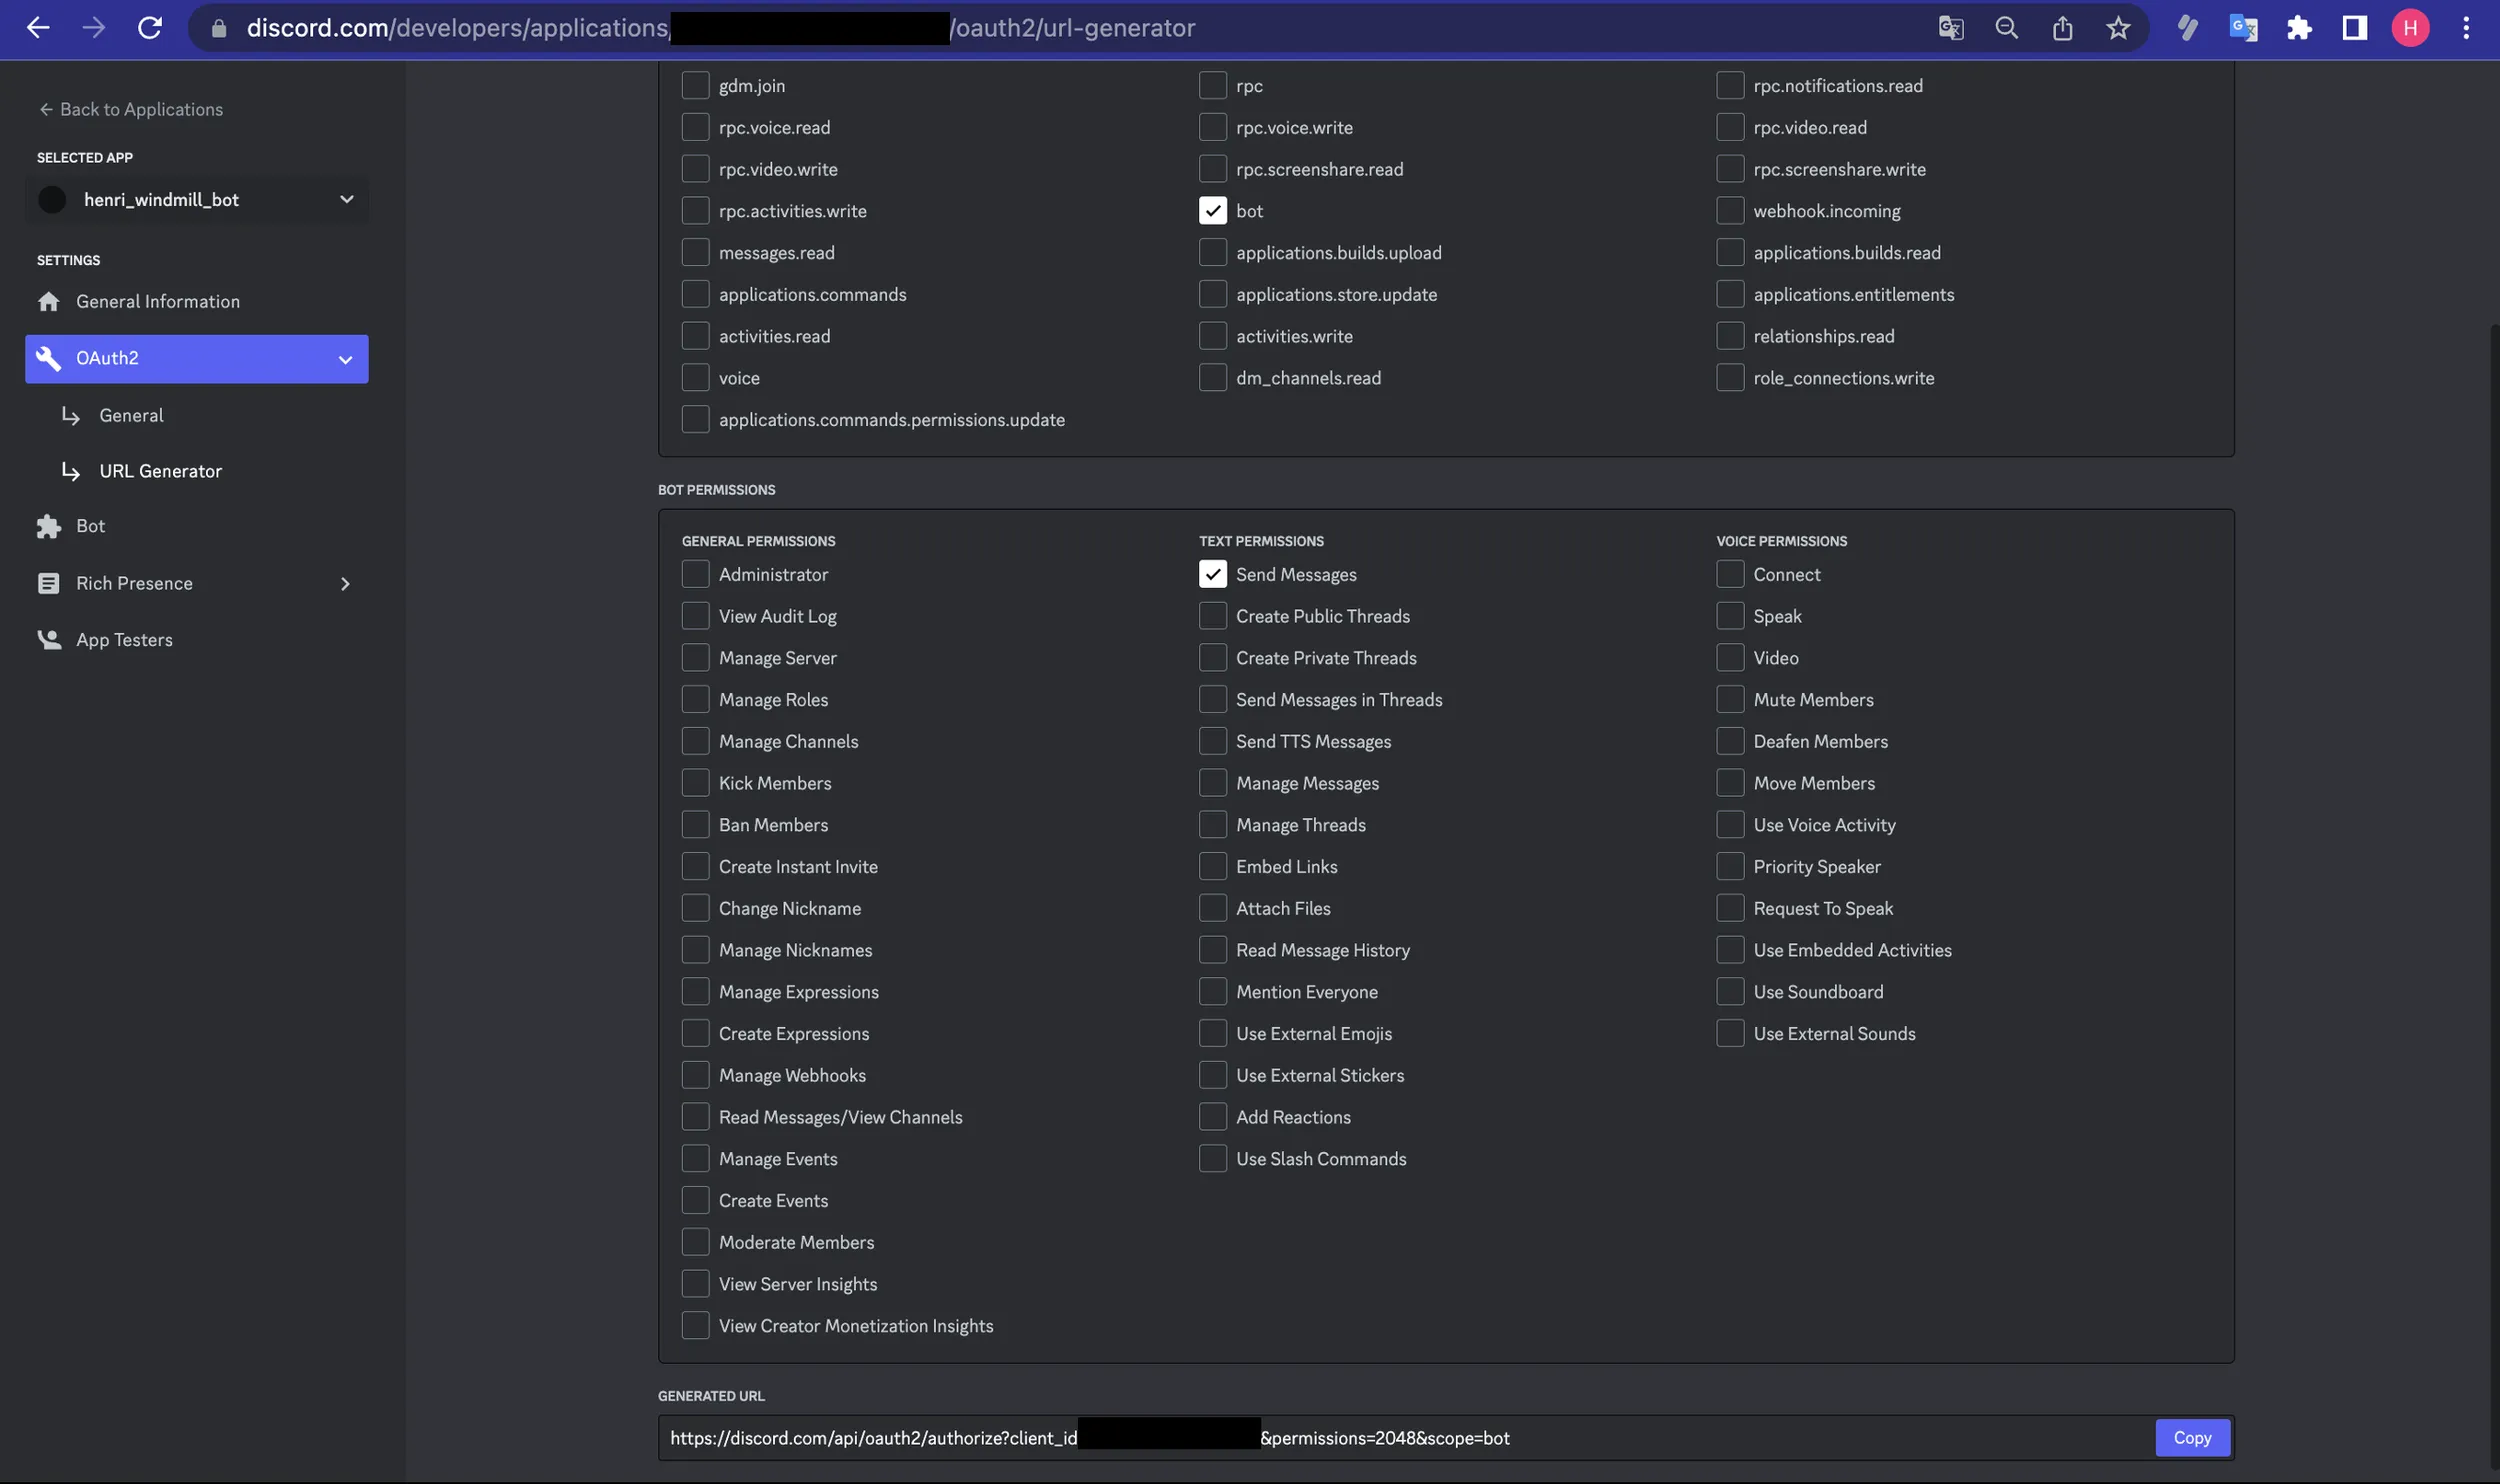
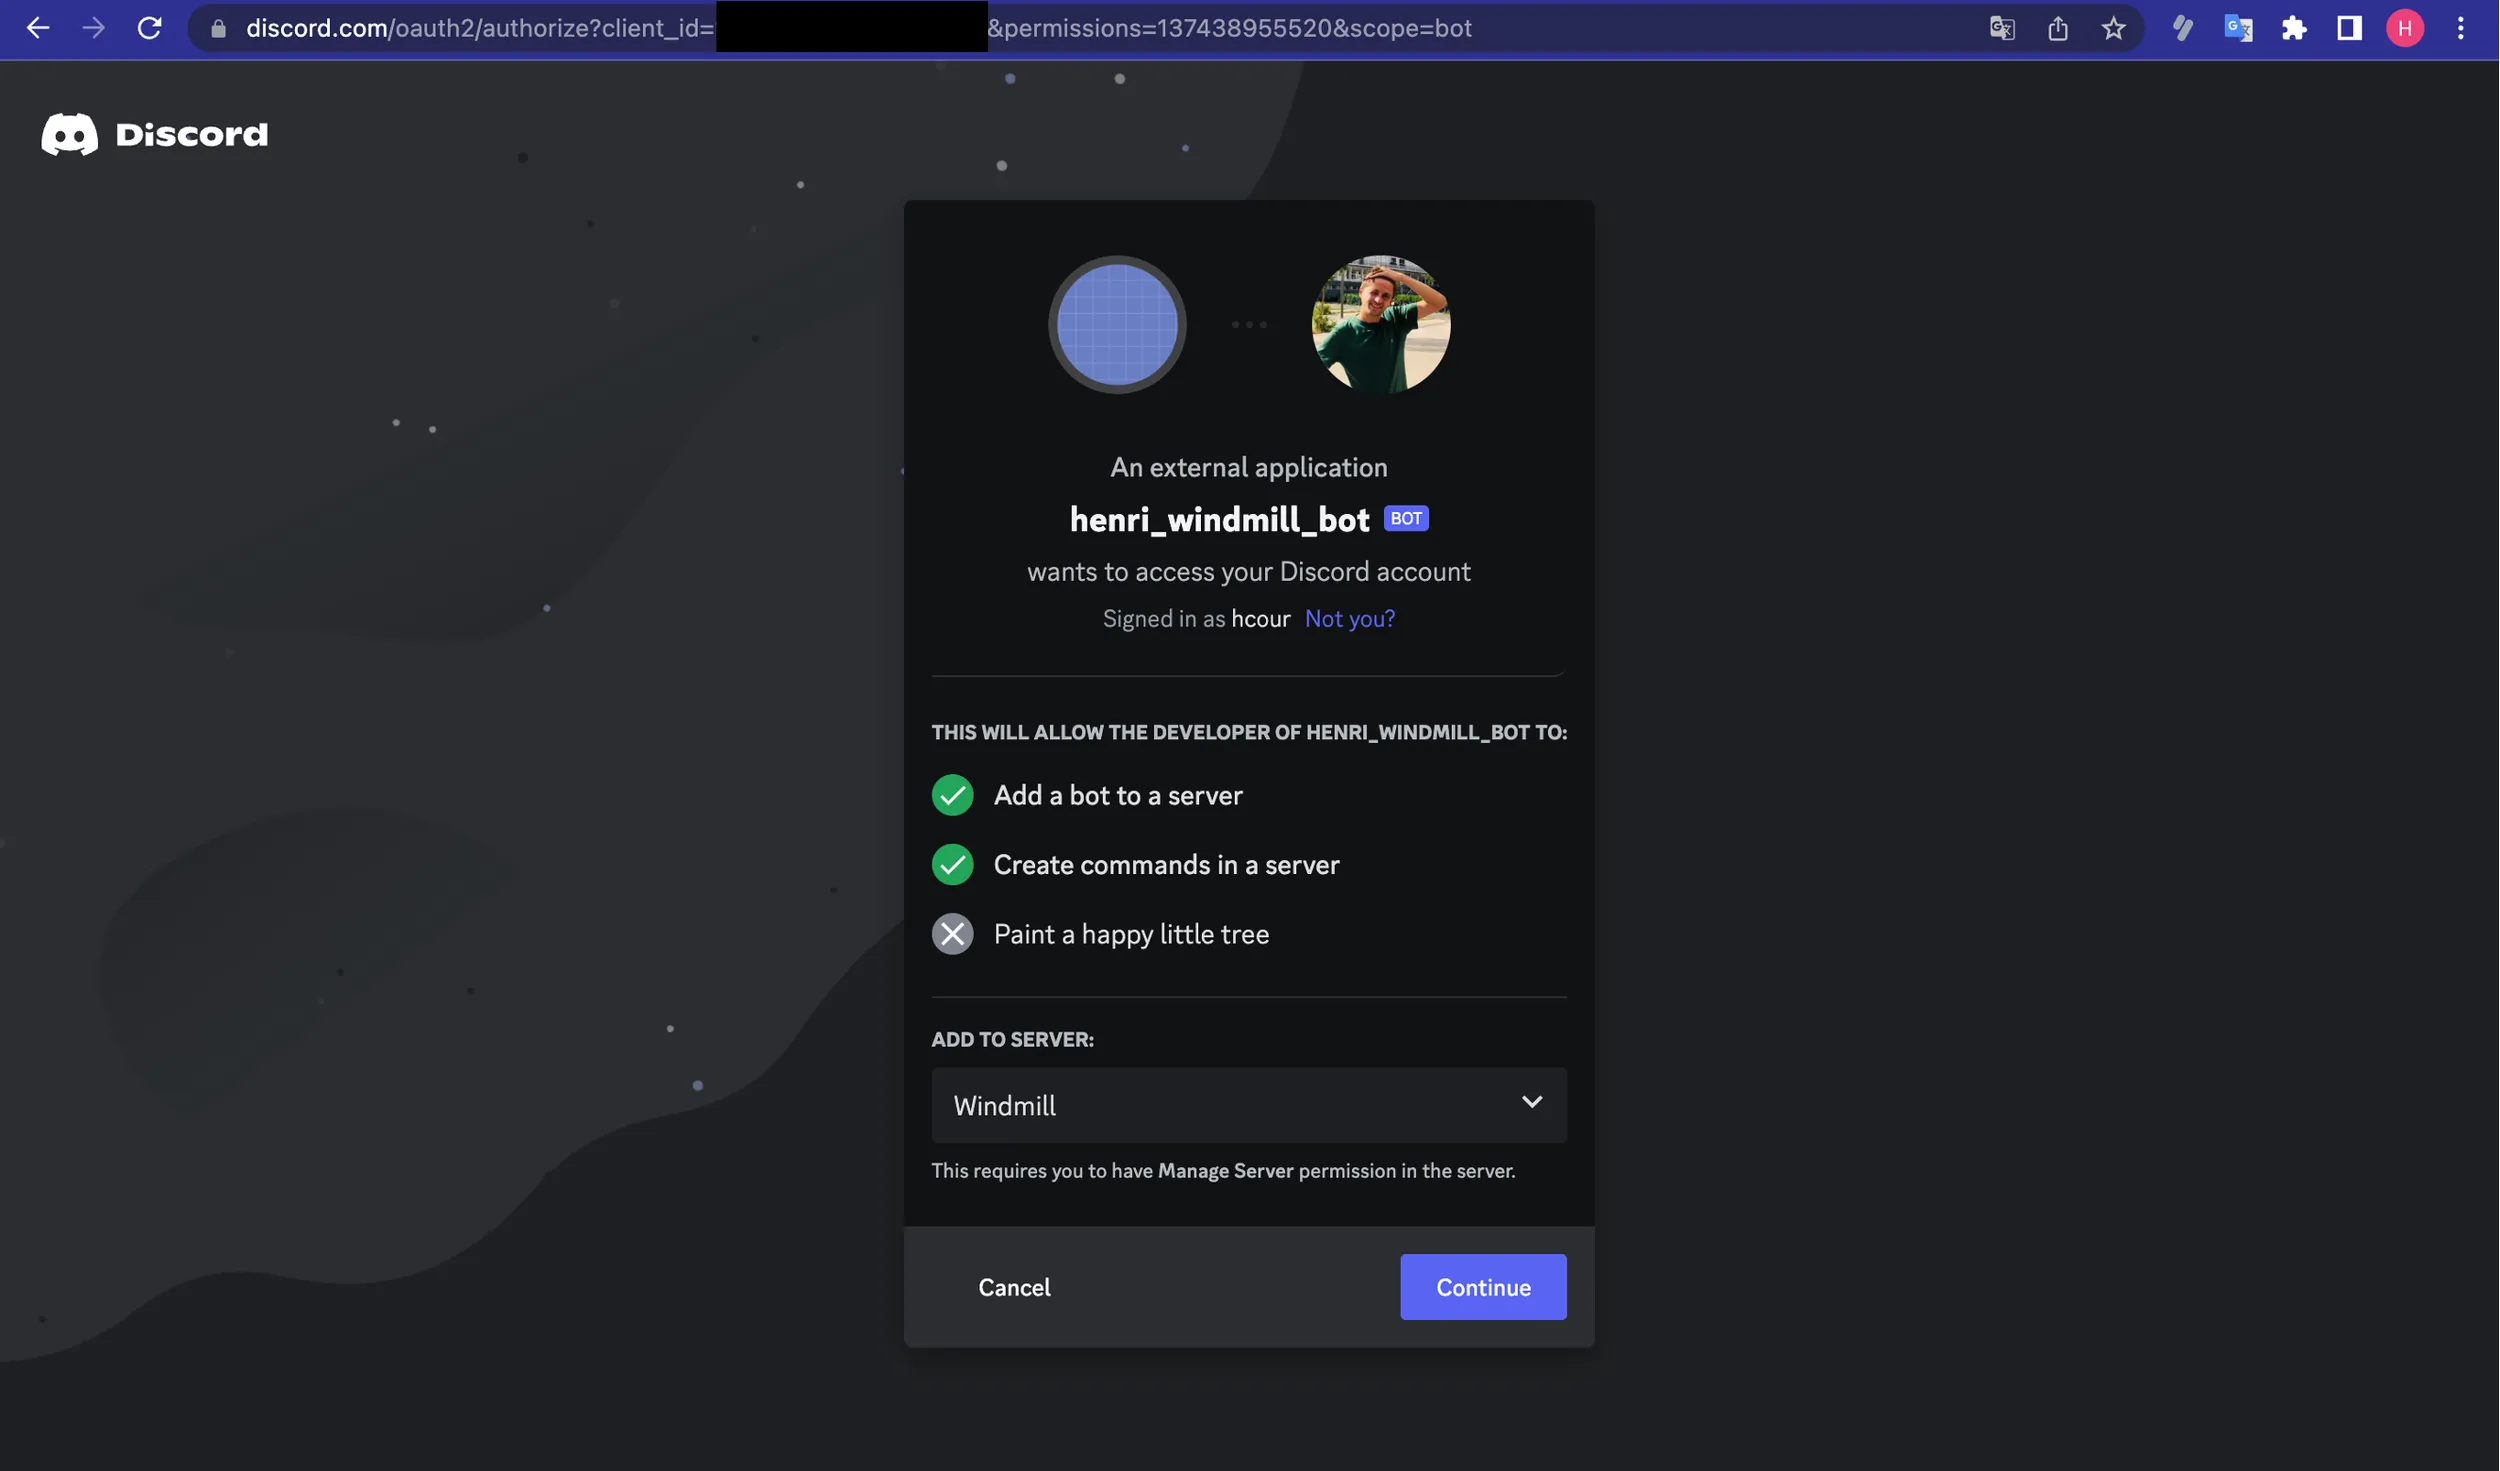
Add the bot to your server
- Go to the Discord Developer Portal.
- Pick your application.
- Choose
OAuth2menu, thenURL Generator. - Enable
botandSend Messages. - Copy the "Generated URL", paste it to your browser and pick the server to add it to.
Then from Server Settings - Integrations - Bots and Apps you can check if your command was successfully added.
Configure your Discord Bot command
Once you have created your application and added the bot to your server, you can configure your Discord Bot command. This involves sending a command configuration to the Discord API. Refer to the Discord API documentation for detailed instructions on how to register a command for your bot.
You can also add the command executing this script.
Create the Discord Answer flow
A template is available on the Windmill Hub: Generate answer from embeddings with intermediate approval step.

This flow will generate the answer and send it back to Discord. It is composed of the following steps:
- Verify and defer the request from Discord.
- Extract the question from the Discord request.
- Create the answer using the question and the embeddings and OpenAI.
- Create an approval step to validate the answer by a human.
- If validated, send the answer publicly.
Verifying the Discord request and Defer
We need to verify the request from Discord and defer it. This is a requirement from Discord. Discord gives us the following parameters as query parameters:
x_signature_ed25519: theX-Signature-Ed25519header from the Discord request.x_signature_timestamp: theX-Signature-Timestampheader from the Discord request.raw_string: the stringified interaction payload from the Discord request.
We can pipe these parameters to the script or flow inputs using the include_header query parameter See Building the URL for the Discord Interaction endpoint.
We need to need three things to verify the request:
- If the signature are not valid, we need to throw an error.
- If the request is a
PING, we need to respond with aPONG. Discord will send aPINGrequest when registering the command. - If the request is not a
PING, we need to respond with aDEFERRED_CHANNEL_MESSAGE_WITH_SOURCE. This will tell Discord that we are working on the request and that we will send the answer later.
Code: Verifying the Discord request and Defer
import { type Resource } from 'https://deno.land/x/[email protected]/mod.ts';

import {
	InteractionResponseType,
	InteractionType,
	verifyKey
} from 'npm:[email protected]';

type DiscordInteraction = {
	id: string;
	token: string;
	type: InteractionType;
};

export async function main(
	x_signature_ed25519: string,
	x_signature_timestamp: string,
	raw_string: string,
	token: string,
	discord_config: Resource<'c_discord_bot'>
) {
	const interaction: DiscordInteraction = JSON.parse(raw_string);

	// We'll need the http request body as a string and the two headers to verify the request signature
	// https://discord.com/developers/docs/interactions/receiving-and-responding#security-and-authorization
	const isVerified = verifyKey(
		raw_string,
		x_signature_ed25519,
		x_signature_timestamp,
		discord_config.public_key
	);

	if (!isVerified) {
		throw new Error('The request signature is not valid');
	}

	// If we get a PING, we need to respond with a PONG
	const type = interaction.type as InteractionType;
	if (type === InteractionType.PING) {
		return { type: InteractionResponseType.PONG };
	}

	return { type: InteractionResponseType.DEFERRED_CHANNEL_MESSAGE_WITH_SOURCE };
}
Extract the question from the Discord request
Let's extract the question from the Discord request.
Code: Extract the question from the Discord request
export async function main(interaction: any) {
	return interaction?.data?.options?.[0]?.value ?? 'No question asked';
}
Create the answer using the question, the embeddings and OpenAI
To create the answer, we will follow the following steps:
- Create the embeddings for the question.
- Retrieve the documents from Supabase using the
match_documentsfunction. - Using a prompt, use GPT-4 or any other models to generate the answer given the question and the documents.
- Return the answer.
The prompt is the following:
You are an AI assistant providing helpful advice. You are given the following extracted parts of a long document and a question. Provide a conversational answer based on the context provided.
If you can't find the answer in the context below, just say "Hmm, I'm not sure." Don't try to make up an answer.
If the question is not related to the context, politely respond that you are tuned to only answer questions that are related to the context.
Please note that images, figures, or any visual content will not be included in the provided context, so you must not try to include them in an answer.

Context sections  :
${contextText}
Question: """
${query}
"""
Answer as markdown (including related code snippets if available):
Code: Create the answer using the question and the embeddings and OpenAI
import * as wmill from 'https://deno.land/x/[email protected]/mod.ts';

import { refreshAndRetryIfExpired } from 'https://deno.land/x/[email protected]/mod.ts';
import { Configuration, OpenAIApi } from 'npm:[email protected]';
import { stripIndent } from 'https://esm.sh/[email protected]';
import GPT3Tokenizer from 'https://esm.sh/[email protected]';

export async function main(
	query: string,
	supabaseAuth: wmill.Resource<'supabase'>,
	openAiAuth: wmill.Resource<'openai'>,
	token?: {
		access: string;
		refresh: string;
		expires_at?: number;
	},
	maxToken: number = 5000
) {
	let answer = '';
	const links: string[] = [];

	await refreshAndRetryIfExpired(supabaseAuth, token, async (client) => {
		// OpenAI recommends replacing newlines with spaces for best results
		const input = query.replace(/\n/g, ' ');

		const configuration = new Configuration({
			apiKey: openAiAuth.api_key,
			organization: openAiAuth.organization_id
		});
		const openai = new OpenAIApi(configuration);

		// Generate a one-time embedding for the query itself
		const embeddingResponse = await openai.createEmbedding({
			model: 'text-embedding-ada-002',
			input
		});

		const [{ embedding }] = embeddingResponse.data.data;
		const { data: documents } = await client.rpc('match_documents', {
			query_embedding: embedding,
			match_threshold: 0.5, // Choose an appropriate threshold for your data
			match_count: 5 // Choose the number of matches
		});

		const tokenizer = new GPT3Tokenizer({ type: 'gpt3' });
		let tokenCount = 0;

		let contextText = '';

		for (let i = 0; i < documents.length; i++) {
			const document = documents[i];
			const content = document.content;

			const encoded = tokenizer.encode(content);
			tokenCount += encoded.text.length;

			if (tokenCount > maxToken) {
				contextText += `${content.trim().substring(0, maxToken)}\n---\n`;
				links.push(document.link);
				break;
			}

			contextText += `${content.trim()}\n---\n`;
			links.push(document.link);
		}

		const prompt = stripIndent`
		You are an AI assistant providing helpful advice. You are given the following extracted parts of a long document and a question. Provide a conversational answer based on the context provided.
    If you can't find the answer in the context below, just say "Sorry, I don't know" Don't try to make up an answer.
    Please note that images, figures, or any visual content will not be included in the provided context, so you must not try to include them in an answer.

    We will provide both the context and the question at the end.
    Answer as markdown (including related code snippets if available).

    Context:
    ${contextText}
    Question: """
    ${query}
    """
  `;

		try {
			const completionResponse = await openai.createChatCompletion({
				model: 'gpt-4',
				messages: [{ role: 'user', content: prompt }],
				max_tokens: 512, // Choose the max allowed tokens in completion
				temperature: 0 // Set to 0 for deterministic results
			});
			const {
				id,
				choices: [{ message }]
			} = completionResponse.data;

			answer = message?.content ?? '';
		} catch (e) {
			console.log(e);
		}
	});

	return { answer, links };
}
Depending on your OpenAI plan, you might need to change model: 'gpt-4', to model: "gpt-3.5-turbo",.
Create the approval step to validate the answer by a human
We can leverage an approval step to validate the answer by a human. Basically, the flow is suspended until we either approve or reject the answer. Windmill exposes 3 endpoints:
- an URL to approve the answer
- an URL to reject the answer
- an URL of the approval page.
We can use Discord buttons to approve or reject the answer.
The token input is the token of your Discord bot. We see that in the Create an application on Discord Developer Portal section.
Code: Create the approval step to validate the answer by a human
import * as wmill from 'https://deno.land/x/[email protected]/mod.ts';
import { REST } from 'npm:@discordjs/[email protected]';
import { API, ButtonStyle, MessageFlags } from 'npm:@discordjs/[email protected]';
import { ActionRowBuilder, ButtonBuilder } from 'npm:@discordjs/[email protected]';

export async function main(
	question: string,
	answer: string,
	links: string[],
	token: string,
	interaction: any
) {
	const rest = new REST({ version: '10' }).setToken(token);
	const api = new API(rest);
	const { resume, cancel } = await wmill.getResumeUrls('Faton');

	const confirmButton = new ButtonBuilder()
		.setLabel('Confirm Message')
		.setURL(resume)
		.setStyle(ButtonStyle.Link);

	const row = new ActionRowBuilder<ButtonBuilder>().addComponents(confirmButton);

	await api.interactions.editReply(interaction.application_id, interaction.token, {
		content: `## ${question}\n\n${answer}\n## Sources:\n${links.map((l) => `${l}\n`).join('')}`,
		components: [row.toJSON()],
		flags: MessageFlags.Ephemeral
	});
}
Learn more about approval steps
Send the answer back to Discord
Once approved, the flow will resume and the answer will be sent back to the user.
Code: Send the answer back to Discord
import { REST } from 'npm:@discordjs/[email protected]';
import { API } from 'npm:@discordjs/[email protected]';

type DiscordInteraction = {
	application_id: string;
	token: string;
};

export async function main(
	interaction: DiscordInteraction,
	question: string,
	answer: string,
	links: string[],
	token: string
) {
	const rest = new REST({
		version: '10'
	}).setToken(token);
	const api = new API(rest);

	await api.interactions.followUp(interaction.application_id, interaction.token, {
		content: `## ${question}\n\n${answer}\n## Sources:\n${links.map((l) => `${l}\n`).join('')}`
	});
}
Create the Slack Answer flow
The Slack Answer flow is similar to the Discord Answer flow. The only difference is that we use Slack buttons instead of Discord buttons.
Code: Create the approval step to validate the answer by a human
import { getResumeEndpoints, Resource } from 'https://deno.land/x/[email protected]/mod.ts';
import { WebClient } from 'https://deno.land/x/[email protected]/mod.ts';

export async function main(
	slack: Resource<'slack'>,
	channel: string,
	text = 'A flow is requesting an approval to be resumed'
) {
	const web = new WebClient(slack.token);

	const { cancel, resume } = await getResumeEndpoints(`channel-${channel}`);
	await web.chat.postMessage({
		channel,
		text: '',
		blocks: [
			{
				type: 'section',
				text: {
					type: 'mrkdwn',
					text: text
				}
			},
			{
				type: 'divider'
			},
			{
				type: 'actions',
				elements: [
					{
						type: 'button',
						style: 'danger',
						text: {
							type: 'plain_text',
							text: 'Cancel',
							emoji: true
						},
						url: cancel
					},
					{
						type: 'button',
						style: 'primary',
						text: {
							type: 'plain_text',
							text: 'Approve',
							emoji: true
						},
						url: resume
					}
				]
			}
		]
	});
}
Finally we can send the answer back to Slack using this script from the Hub: Send a message to a channel.
Building the URL for the Discord Interaction endpoint
Create the Discord Interaction endpoint
Every Windmill script or flow exposes a webhook endpoint that can be used to trigger it.
We can create a new flow that will be triggered as the Discord Interaction endpoint.
Discord will give as flow inputs the following parameters:
x_signature_ed25519: theX-Signature-Ed25519header from the Discord request.x_signature_timestamp: theX-Signature-Timestampheader from the Discord request.raw_string: the stringified interaction payload from the Discord request.
Let's create the URL for the Discord Interaction endpoint.
- Go into the Webhooks section of the "Discord flow" flow's
Detailpage. - Copy the
Result/Syncwebhook URL. - Create a webhook-specific token.

Windmill supports a special query parameter ?include_header=<header1>,<header2> that can be used to pipe headers from the request to the script or flow parameters.
Discord mandates that we verify the request before responding to it, so we need to include the X-Signature-Ed25519 and X-Signature-Timestamp headers in the request to verfiy the Discord request. We also added the raw query parameter to get the raw stringified body.
The URL should look like this:
{Result/Sync URL}?include_header=X-Signature-Ed25519,X-Signature-Timestamp&raw=true&token={Webhook-specific token}
Copy and paste this URL into the Discord Interaction endpoint.

Early return
Discord expects a response within 3 seconds, yet the flow might take longer to run.
It is possible to define a node at which the flow will return at for sync endpoints. The rest of the flow will continue asynchronously.
We need to configure the early return node to return after the verification step.

We can use early returns to defer the request from Discord as soon as possible in sync, and then continue the flow asynchronously.
Create the Slack Interaction endpoint
For Slack, we will use the Slack web client to send ephemeral messages to the user while the bot is thinking. We receive the following parameters from Slack:
text: The text of the messagechannel_id: The channel IDuser_id: The user ID
Code: Create the Slack endpoint
import { Resource } from 'https://deno.land/x/[email protected]/mod.ts';
import { JobService } from 'https://deno.land/x/[email protected]/mod.ts';
import { WebClient } from 'https://deno.land/x/[email protected]/mod.ts';

export async function main(
	text: string,
	slack: Resource<'slack'>,
	channel_id: string,
	user_id: string,
	workspace: string,
	path: string
) {
	const client = new WebClient(slack.token);

	await client.chat.postEphemeral({
		text: 'Bot is thinking...',
		channel: channel_id,
		user: user_id
	});

	await JobService.runFlowByPath({
		workspace,
		path,
		requestBody: {
			text,
			channel_id
		}
	});
}
Conclusion
This is an example that with the right tools, you can quickly build a solution thait is tailored to your needs and hence can be better than a fully-featured, but generic solution.
If you have any questions or need further assistance, don't hesitate to reach out to the Windmill community on the Windmill Discord Server. Happy bot building!
How to setup it yourself
Summary
- Create the Supabase database.
- Fork the
Extract and embed documentation for semantic searchflow from the Hub and configure it with your credentials. - Run it once to generate the embeddings, and configure it to run on a schedule.
- Create a Discord bot.
- Fork the
Generate answer from embeddings with intermediate approval stepflow from the Hub and configure it with your credentials. - Fork the
Verify the Discord Request, Defer and trigger a flowflow from the Hub and configure it with your credentials. - Get the webhook URL to trigger the flow, configure it and copy it to the Discord Interactions configuration.
Video Tutorial
Links
-
Supabase's Storing OpenAI embeddings in Postgres with pgvector tutorial.
You can self-host Windmill using a
docker compose up, or go with the cloud app.